Henrý Þór

Computer scientist, AWS Certified, Platform Engineer

Terraform, Terragrunt and dependencies

Terraform

Terraform is a tool that helps Ops, DevOps and Platform Engineers build infrastructure in code.

Terraform is really great at helping you plan your infrastructure and deploy it in the correct order. It does this by building a dependency graph within the state you’re applying.

However, it is in most cases unrealistic to keep your entire infrastructure in one state file. That is because reading your state and detecting any changes or discrepancies between the code and the infrastructure will take a long time, and making changes will feel more stressful than it needs to.

Separating the state serves to reduce scope of potential changes. Dependencies between these modular states can be handled with remote-state data sources.

The problem

Most often in IaC we need to reproduce multiple environments with the same code. And while we can modularize our terraform code we end up with the dependencies and the module inputs repeated across multiple files in our source code tree.

Terraform is, for instance, unable to use variable interpolation in the string that points you to the S3 bucket if you store your terraform state in a bucket. So right there you need to repeat that piece of the code for each environment because a bucket name is globally unique so you need a dev-xxx-terraform staging-xxx-terraform and prod-xxx-terraform buckets in each respective environment.

This leads to repeated code and often, in a fast paced environment, can lead to divergence. It starts off small, as you copy paste code around, but eventually you might find yourself with unexpected feature divergence between environment which is definitely not what we want to see in our infrastructure. We need consistency to be able to ensure quality of the products we are deploying.

Another thing that commonly occurs is that infrastructure is developed piece by piece. You add something to this state, and then have this state depend on that particular new component, and so on until you accidentally wind up with a circular dependency that cannot be solved unless you target-apply your way around it and even then without being able to target apply outputs into the state it might not work at all without using some tricks like static input values as you wait for the state outputs to be all available.

Imagine for instance that you start off with a CI/CD IAM role. The CI/CD role only manages static code in an S3 bucket so you add that into the CI/CD state and give it permissions to write to it there. Down the road you add a CloudFront, which you want to manage in its own state, so you create that. The CloudFront uses the S3 bucket, so it imports it from the CI/CD state. You also want to add permissions in your CI/CD role’s IAM policy to manage the CloudFront distribution so you write that into the CI/CD state’s IAM policy and import the CloudFront distribution with a remote state.

Everything works for now but you’ve introduced a circular dependency so when you move this all up from the development environment to a new staging environment you’ll need to refactor it or it won’t apply correctly

Terragrunt

Terragrunt is a thin wrapper for Terraform that introduces some constraints. For one, you need to declare all your states and your dependencies between them. Terragrunt builds a dependency graph from your states dependencies, and if there are cycles there it will refuse to apply.

And if you follow Terragrunt’s documentation you will write each terraform module’s input in only one file which loads different local variables depending on the environment you’re applying so you can still name your infrastructure for its environment and maintain globally unique entities such as S3 buckets.

The common way to build Terragrunt code is to have common .hcl modules for each of the states and then use the name of current directories names to figure out which environment and which state you’re working on, but those directories all just contain some boilerplate code to find the right common .hcl modules and root terragrunt module so terragrunt can build the terraform module inputs.

Have you ever run into state divergence in terraform? Have you had to use diff to figure out the difference between terraform code for different environments?

Installing Linux on Lenovo Yoga 910

I just updated my workstation. Excitement got the better of me and I bought a Lenovo Yoga 910 with FHD screen, i7 7500U Kaby Lake processor, 512gb PCIe m2 harddisk, and 16 gb RAM. This is a rather recent laptop to comfortably run Linux on.

It’s a touchscreen model, so I wanted Gnome 3, and I wanted to try an Arch Linux variant and decided to get Antergos.

I’m not going to be providing step-by-step instructions with screenshots, but I’d like to offer some key pointers to people wanting to install Linux on this machine. It wasn’t a huge headache, but I had to google a bit to get a few things working.

Before you do anything

I recommend you backup your system, to avoid loss of warranty, loss of data or worse yet a bricked system. It’s entirely possible, and backing the system up takes something like 15 minutes to a pretty standard USB3 external harddisk. You shouldn’t need more than about 100gb free space.

Here’s what I did.

The RAID mode

The firmware of the Yoga by default uses an Intel RAID device mode to access the disk. Which is weird, but fine I guess. Except for the fact that Linux doesn’t support this device type. This was a huge controversy with regards to Lenovo and Linux recently, with the community accusing Lenovo and Microsoft of hindering Linux installation. A crazy conspiracy theory.

To everyone’s relief, Lenovo updated its BIOS to allow users to switch between RAID and AHCI modes. Which means we can install Linux on the disk.

The biggest issue is if you want to dual boot between Linux and Windows, you’ll have trouble with windows claiming it can’t find its boot device.

Luckily there is a simple fix for this.

Before installing Linux, boot into Windows and open command prompt as administrator. With it we want to schedule a safeboot on the next boot up with the following command:

bcdedit /set {current} safeboot minimal

Then turn off your machine. To enter BIOS mode, get a toothpick or something and press on that tiny button to the right of the power button on the side of the machine. The machine will open with a prompt. Go into the BIOS, switch from RAID to AHCI mode, then save and exit. Windows will bootstrap itself with safeboot, fixing the driver issue between RAID and AHCI on the way there. Reopen command prompt as administrator and turn off the safeboot option:

bcdedit /deletevalue {current} safeboot

Now the machine should reboot into Windows just fine with AHCI mode enabled. Props to TooBad for this.

One other thing you should disable is fast boot, which is accessible under Settings -> System -> Power & Sleep -> Additional Power Settings -> Choose what the power button does (wow, Windows…). I haven’t tried this without disabling it, but various sources recommended disabling it.

Make room for Linux

It’s a matter of preference how you do this, I prefer using GParted, which you can use once you boot up to Antergos install. Or you can use Windows Disk Management.

As for sizes. I about halved the space for Windows, used around 40gb for root (/), 64mb for /boot, and 64mb for /boot/efi, and the rest for /home. You could skip creating a new EFI partition and just reuse the one already on the system, as long as you make sure you don’t format it, but I’m superstitious.

Install Antergos

Now you should be prepared to install Antergos. Just go to the website and get the Live ISO and put it on a thumbdrive, a process that should be familiar to most of you, but if not take a look at Rufus.

Now turn off your machine, and as before use the small button next to the power button. I believe Lenovo call this the Novo button.

From there you’re going to want to disable SafeBoot and change the boot order to run the Antergos USB thumbdrive first. Then save and exit.

Allow Antergos to boot from its primary boot option.

Here you’ll be presented with the trouble of connecting the Yoga to the Internet via wifi while the system claims wifi is disabled by a hardware key. Don’t worry about it. This is a common Lenovo problem with the ideapad_laptop kernel module. Just open a Terminal and remove the module:

sudo rmmod ideapad_laptop

After you’ve installed you can blacklist this module.

After you get WiFi working, just install Antergos, selecting as few additional packages as you can. Not to worry you’ll just finish setting up once everything’s done.

Re-detecting Windows

At first Grub will just show Antergos, but don’t worry. Just boot into the system and open up a Terminal and probe for other operating systems:

sudo os-prober

And then save the configuration

grub-mkconfig -o /boot/grub/grub.cfg

And you should be able to reboot and boot between Windows and Antergos.

Smaller issues

There are a few issues. The fingerprint scanner doesn’t have a driver on Linux yet. And initially the touchpad is a bit wonky; here’s a tip for that.

And that’s it

You should be done, or atleast in a familiar setting, by now. In case I forgot something you can drop me a line on Twitter, I’m @henrythor


EDIT: Touchpad gestures

To get gestures for switching workspaces with 3 finger swipe up/down, and back/forward in browsers with left and right swipes, I used libinput-gestures which can be installed via yaourt:

yaourt -S libinput-gestures

And then following the instructions on screen after install or referring to the docs on the github page.

It didn’t initially work for me, but once I stopped it and ran libinput-gestures -v, then tried a few gestures, it started working fine for some reason and then worked on reboot:

libinput-gestures-setup stop

libinput-gestures -v

libinput-gestures-setup start

My Erlang/Cowboy summer

During the summer I worked at a startup, based around the concept of screen sharing with zero-configuration on one end. That means the one viewing the screen cast doesn’t need an application or plugin, they just need a browser on a PC or smart device.

This is useful for customer service agents who want to quickly show their clients how to do things instead of describing to them “click on account, click on advanced, click on edit.” Or for the salesman who wants to go over contract stipulations or edit a form with a client on the phone. Or for someone showing their grandmother how you change screen resolutions or font size.

Shaky foundations

The proof of concept server, written by one of the founders, was written in Javascript using Node.js to forward socket.io data carrying messages and image data across the network. Node.js and Javascript are fine for quick functionality as such, but you inherit alot of Javascript’s problems. It’s very single threaded, and variable assignment is shaky at best. F.eg. did I assign the value, or a reference? Will this function variable work as I expect in another context? Where should I bind ‘this’?

The merit of using Node.js in this project is that it uses Javascript on the client sides anyway, so the solution would consistently be using one language. And Node.js has alot of code-availability.

The downsides are alot of inconsistent behaviours due to side-effects of having global variables, that come in with 1st party and 3rd party code, and it’s just not scalable without using tricks and hacks to either make sure you launch an instance for each session somewhere and have a proxy that makes sure both ends consistently contact the same instance, or have a predefined pool of instances that the load balancer would need to consistently send clients to.

Erlang to the rescue

Rather than doing all that I decided to use Erlang, which I’m familiar with, having used it while working on Telecom systems in years past.

What you get with Erlang and OTP are a lot of tools for solving the issues you’d eventually run into using Node.js. Things like scalability over many nodes using message passing, lightweight processes, and a reasonably fast replicated directory for things like sessions from the Mnesia database.

Giddy-up, Cowboy

What I then needed was a HTTP framework, and that’s where Cowboy comes in. Cowboy’s OTP-derived framework of using handlers for tasks, by design, gives you concurrency, as an Erlang process is launched for each connection made to the server which then calls my code. The OTP model also gives you state which is passed on to handler functions via the main loop of the gen_server-esque handlers Cowboy expects us to provide.

WebSockets are becoming widespread technology

Since something like 86% of browser traffic is from browsers supporting WebSockets, and 96% of browsers in our native Iceland, I decided to design for raw WebSockets rather than rely on frameworks such as socket.io, sockjs or bullet. For one these frameworks don’t work consistently across the different transports. They add processing overhead. And they, in the case of socket.io, work by upgrading the connection. Giving you the poorest possible connection initially and eventually upgrading to WebSocket which 86% already support. Since Service Agents will be connecting via Chrome extension, you can expect them to have working WebSockets.

The rest get REST

And so, I decided to design for WebSockets first and support the remainder of clients with simple REST functionality, where images get buffered and replaced.

Most developers using WebSockets rely on JSON or arrayBuffers for carrying objects safely across the wire. And while JSON may work fine in Javascript, being that it’s almost identical to Javascript objects already, and the decoding and stringifying of objects to JSON and vice versa has been heavily optimized, I didn’t really need all that much JSON handling in the server code. I mostly needed to know the type of message coming in so I’d know what to do with it.

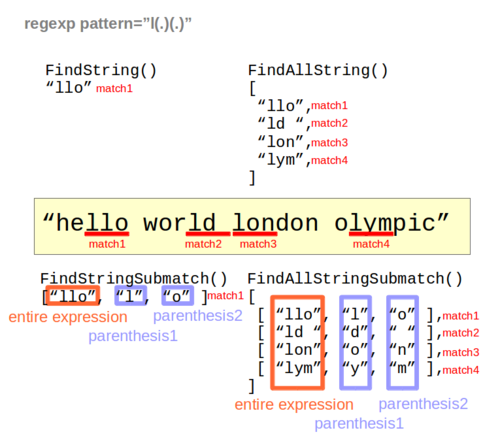
For this I implemented a custom protocol where all messages transported client-to-server begin with a header that has the letters cw, then 8bits for the length of an identifier, then the identifier itself and after that comes the stringified JSON.

If the message is intended for the server to handle, I decode the JSON using jiffy’s return_maps decoder and work on it from there.

The OTP-esque model of Cowboy’s handlers

When I receive a plaintext message via WebSockets in my Cowboy handler I get a call to websocket_handle({text, Data}, Req, State). What I do is parse that message through pattern matching and then send it back to me as a tuple of {identifier, Payload}. It then lands at websocket_info({identifier, Payload}, Req, State). There I use helper functions to determine where to route the message. If it’s intended for the agent, I check our State to see if I’m the Agent. If I am in fact the Agent, I return {reply, {text, Payload}, Req, State} which sends the message over to the Agent via his websocket. If I’m the Viewer according to the state, I check if my state has a counterpart registered (which would be the Agent) and send it to him. If I don’t have a counterpart, either because the connection is fresh or the counterpart has instructed us to delete them because they’re going down, I look in our session directory to find the right counterpart. That counterpart will then receive the exact same message, and since he is the Agent, he returns as previously mentioned.

Mnesia doesn’t forget

Our session directory, like I mentioned earlier, is based on mnesia. Using ram_copies only and replicating by using mnesia’s extra_nodes functionality. I don’t expect to do frequent lookups per session in our directory, but I expect the lookup to be fast. I also don’t care about saving sessions to disk if one or more nodes die.

But what about the REST fallback? To implement that I designed a simple gen_server that receives the same messages as a websocket handler would receive, essentially imitating it. The gen_server registers as a Viewer, updates his state when he receives new frames and returns those to the Viewer when he requests them via our REST service.

Transparent message passing

Message passing in Erlang is transparent, and I don’t need to worry whether the Pid I’m sending to is on the local node or remote, and so I gain clustering capabilities by using nginx as a proxying load balancer forwarding requests to nodes on its private network. Therefore it’s common for the sessions to have Agent connected to one node, while the Viewer is connected to another. And given multiple cores or processors on each node we can reasonably expect each end to have separate scheduling and CPU thread. And all that adds up to low latency communications between Agents and Viewers, where one session’s load shouldn’t negatively affect other sessions, unless there’s a catastrophe where we run out of resources, in which case we need more nodes.

Since the REST assistant gen_server can be contacted by any node, and is registered as a viewer in the session directory, and since websocket connections are persistent I don’t need to worry about where the loadbalancer routes the browser requests. I can rely on Erlang’s message passing in the REST case, and on the connection persistence of TCP for the websocket case.

Play on everyone’s strengths

Since other languages such as C are better suited for things like SSL decryption/encryption I let the loadbalancers handle terminating HTTPS connections.

Though, mind you, had one the hardware capability and inclination, it’s quite simple to implement HTTPS using Cowboy, and even SSL connectivity between individual nodes using inet_tls and a simple cert/key .pem file to have complete end-to-end encryption. And I’ve done that in staging. However I decided not to focus on that capability, and let Erlang do what Erlang is good at and let nginx do what it’s good at.

Final words

So, using Erlang to solve a concurrency problem worked well for me again. Some might say too well. Because after sorting out the server and changing the client to add features such as fullscreen capability and such, my services were no longer desired, as they already had a product, I had no vesting, and with just a week’s worth of notice period I was expendable.

The server, though, still chugs along. Code documented well enough for others. And karma works, not by any supernatural means, but rather by the age-old manner of word-of-mouth, which has a tendency to bite people in the ass, when it comes to hiring talent.

Oh well, I’m on to bigger and better projects anyway. More on that at another time!

If you have questions or suggestions, don’t hesitate, I’m @henrythor

Walking Dad

Walking Dad

Go’s regexp cheatsheet

golang-examples:

Go’s regexp package has 16 variants of Find*() methods. I’m always confused about which method I should use. Use following cheatsheet to find the right method quickly.


4 methods that return strings.

Methods returning strings

4 methods that return indexes.

Methods returning indexex

If you need to match against []byte, use methods without “String” like “Find” or “FindAllSubmatch”.

debax:
“MIPS. God help you if there’s a bug…
” debax:
“MIPS. God help you if there’s a bug…
” debax:
“MIPS. God help you if there’s a bug…
” debax:
“MIPS. God help you if there’s a bug…
” debax:
“MIPS. God help you if there’s a bug…
”

debax:

MIPS. God help you if there’s a bug… 

#Erlang, ASN.1, and TBCD-STRINGs

So, maybe this post will find its way into search results…

So, maybe you’re using Erlang in a Telecom setting…

So, maybe you need to work with asn1ct or asn1rt

So, maybe you need to do something with an IMSI or IMEI that you got from decoding an ASN.1 Call Data Record, or GTP’ stream…

So, maybe the values look unfamiliar and you need a way to make it look like your familiar old IMSI code…

So, maybe here’s some code using a bit of bit syntax and tail recursion?

-module(tbcd).
-export([string_decode/1]).

string_decode(<<>>) -> [];
string_decode(<<Nibble1:4,Nibble2:4,Rest/binary>>) ->
Byte = Nibble1 bor (Nibble2 bsl 4), lists:flatten([io_lib:format("~2.16.0B", [Byte])|string_decode(Rest)]).

Here’s how it does stuff:

1> c("tbcd.erl").
{ok,tbcd}
2> tbcd:string_decode(<<33,67,101,135,9,33,67,245>>).
"123456789012345F"
3>

More #golang adventures..

Here is a program for sorting arbitrary amounts of data that is not already in memory.

The problem it attempts to solve is sorting data which is streaming in, ie from stdin or network, etc.

The way it’s designed is by using two goroutines. One that generates the random numbers, and one that inserts the values into a binary tree. Communication is accomplished by using Go channels.

streamnumbers() seeds the pseudorandom number generator with UNIX nanoseconds, then loops infinitely, generating random integers, creating nodes, and putting them into the channel c.

The program can be altered to handle real world data by putting reading mechanisms into streamnumbers() instead of the rand.Int() stuff.

streamhandler() reads the channel c, and inputs the Nodes it receives into the binary tree.

The main execution thread runs a signal handler that catches interrupt signals (^C) which dumps the binary tree into a slice by inorder traversal, checks if it’s in ascending order, and prints how many items were inserted into the tree before the interrupt.


// Simple code to binary tree sort data that is streaming in
// blog.henry.is

package main

import (
	"fmt"
	"math/rand"
	"os"
	"os/signal"
	"time"
)

type Node struct {
	left, right, parent *Node
	value               int
}

var root *Node = nil

func treeinsert(r **Node, n *Node) {
	var y *Node = nil
	for x := *r; x != nil; x = x {
		y = x
		if n.value < x.value {
			x = x.left
		} else {
			x = x.right
		}
	}
	n.parent = y
	if y == nil {
		*r = n
	} else if n.value < y.value {
		y.left = n
	} else {
		y.right = n
	}
}

func treetraverse(r *Node, S *[]int) {
	if r == nil {
		return
	}
	treetraverse(r.left, S)
	*S = append(*S, r.value)
	treetraverse(r.right, S)
}

func checkifsorted(S []int) bool {
	for i, j := 0, 1; j < len(S); i, j = i+1, j+1 {
		if S[j] < S[i] {
			return false
		}
	}
	return true
}

func streamnumbers(c chan Node) {
	rand.Seed(time.Now().UnixNano())
	for {
		randnum := rand.Int()
		newnode := new(Node)
		newnode.value = randnum
		c <- *newnode
	}
}

func streamhandler(c chan Node) {
	for {
		newnode := <-c
		treeinsert(&root, &newnode)
	}
}

func sighandler(s chan os.Signal) {
	for sig := range s {
		fmt.Printf("Caught: %v\n", sig)
		S := []int{}
		treetraverse(root, &S)
		sorted := checkifsorted(S)
		if !sorted {
			fmt.Println("Array not sorted.")
			os.Exit(1)
		} else {
			fmt.Println("Array is sorted.")
		}
		fmt.Printf("n=%d\n", len(S))
		os.Exit(0)
	}
}

func main() {
	c := make(chan Node)
	go streamnumbers(c)
	go streamhandler(c)

	s := make(chan os.Signal, 1)
	signal.Notify(s, os.Interrupt)
	sighandler(s)
	os.Exit(0)
}

Some thoughts on Go #golang

I recently decided to take a look at the new programming language, Go, designed by Robert Griesemer, Rob Pike, and Ken Thompson, and backed by Google Inc.

I’ve used alot of languages for hobby and for work. Started in C, moved to C++, then Perl, Java, Python, and tried my hand with a host of other languages. Each has its strong suits and I like finding new tools for the job.

Go’s an interesting language. It’s a descendant of C, but offers major differences in the way variables and functions are declared. Instead of the variable’s type being on the left side of the variable name, now they’re on the right. The theory is that this makes complex declarations more readable.

Functions are declared only once in this language, code is imported, and thus no stubby header files required for the importing of functions.

It’s statically typed, but provides the shorthand operator := for variable declarations which makes the new variable on the left inherit the type of the variable or constant on the right of the operator. Quite a clever time saver for those of us used to the dynamic typing of Perl, Python, et al.

It’s a compiled language, but the swiss knife go application, which works as a frontend to the compiler, documentation system and even the module fetcher, has a run option which makes it faster to compile and run the application for testing, like interpreted languages offer. It just compiles the program to an a.out, runs it, and deletes the a.out. But still, nice feature.

In fact the entire system seems to be geared towards very quick compiles. According to documentation, even large executables should take no more than a few seconds to compile.

One advantage that an interpreted language has is that it’s easy to run the interpreter and use it to get a feel for the language, getting immediate response to what a line of code does, rather than having to write a bunch of little programs to see how the language’s features actually work.

It has great concepts for parallel computing, goroutines (or coroutines), way more sophisticated than Pthreads where the programmer is left with worrying about all the concurrent data access and synchronization himself. Go makes it rather transparent. And offer things like channels for inter thread communications.

It’s got elements from object oriented programming languages like C++, Java, et al. such as interfaces, types, and methods. But it doesn’t have classes, type inheritance, or method overloading. It doesn’t provide Exceptions, instead forcing programmers to adopt other more common practices for error handling, rather than treating every error as exceptional. This is facilitated by allowing functions to return two or more values. Say one with the actual output and one with error codes, or nil in case of no errors.

Slices are a pretty cool addition to the C family of languages, and one that immediately caught my eye, cause I love slicing arrays in Python. Slices are like arrays, but not quite. Slices can be sliced by passing from and to offsets (f.eg. A[x:y].) Slices makes sure to keep you within bounds so you don’t read and write where you’re not supposed to. Further, you can slice any slice without copying data, effectively passing that region on by reference, making it efficient for stuff like Quicksort.

However, the downside to slices is that they don’t grow. The de facto solution to this is creating a new slice and using the function copy(new, old) to copy data around and then reassigning the variable to the new slice. Inelegant in my opinion. I’d love a stack and deque please. However, you won’t have to worry about leaking memory doing this copy and reassignment – Go has its own garbage collector. 

Another thing about Go’s slices that I miss from array slicing in Python is that you can’t provide negative offsets, that is offsets from the end of the array. It just makes the code uglier to calculate offsets with A[len(A)-3:] than just A[-2:]

I said before that slices lend themselves beautifully to Quicksort, so I’ll prove that by showing you this piece of code. The first thing I wrote in Go:

package main
import (
	"fmt"
	"math/rand"
)

// Before: S is an unsorted slice
// After: S is a slice with elements before i smaller than or equal to S[i] and elements after i bigger than S[i]
func Partition(S []int) (int) {
	rand := rand.Int() % len(S)
	last := len(S) - 1
	S[last], S[rand] = S[rand], S[last] // Move a random item to the last seat, for pivot
        i := -1
	for j := 0 ; j < last ; j++ {
                if S[j] <= S[last] {
			i++
			S[i], S[j] = S[j], S[i] // Swap values at i and j
		}
	}

	i++
	S[i], S[last] = S[last], S[i] // Swap values at i and last, moving the pivot to the spot between the lower segment and higher segment
	return i
}

// Before: S is an unsorted slice
// After: After recursive runs, slice S is sorted
func QuickSort(S []int) {
	if len(S) > 1 {
		q := Partition(S)
		QuickSort(S[:q])
		QuickSort(S[q:])
	}
}

func main() {
	var S = []int{9, 4, 3, 6, 1, 2, 10, 5, 7, 8}
	fmt.Println(S)
	QuickSort(S)
	fmt.Println(S)
}

You can run it with the command go run quicksort.go or compile it with go build quicksort.go


Update: Apparently slices can grow: http://golang.org/doc/effective_go.html#append (thanks to Uriel Étranger)

It really ties a room together!

It really ties a room together!